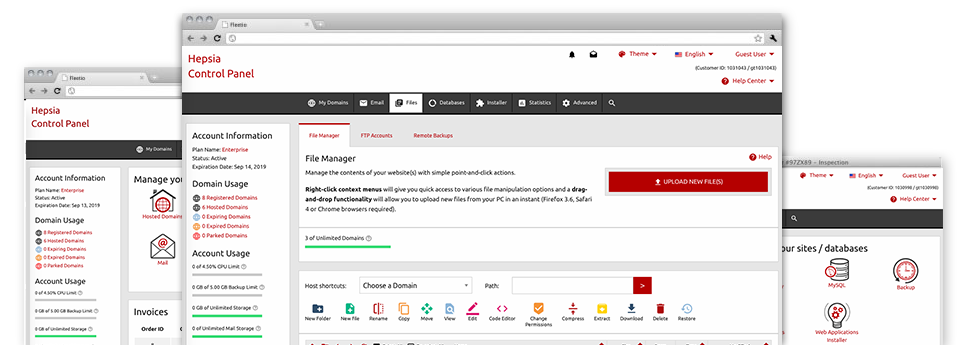
With the NameDo NameDomains Control Panel, you’ll gain access to our feature–rich File Manager. It will enable you to speedily control all of your websites without the need to make use of an FTP tool. You could upload files through a risk–free connection by dragging them into the browser. Additionally, you could rapidly archive and unarchive files and directories, set up password–protected areas, adjust file permissions and so much more. Check out the attributes contained in our File Manager.
Drag ’n’ drop file uploads
The most straightforward method to upload files
Adding files with an FTP client is an out–of–date and quite an insecure way of transferring data files from your personal computer to a hosting server. For this reason, we have included drag & drop file publish support in the File Manager. Simply pull the files that you need to publish from your PC into your browser and they’ll begin to publish in your hosting account over a risk–free SSL communication.
You don’t have to set up any extra software, web browser extensions or apps. The drag–and–drop function works equally well on Windows, Linux and Mac.
Right–click context menus
All of the file administration possibilities in front of you
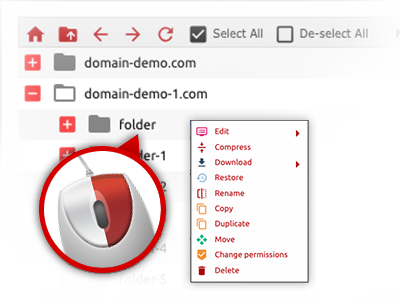
We’ve given our best to make your File Manager as easy–to–use as it can be, so you are able to come up with changes to your files. Besides the standard control bar at the top of the web page, we have now furthermore included right–click context menus with all the current general file control options. Just click on a file or folder and select the actions that you want through the list that will appear.
You’re able to rename, copy, move, download, edit, preview, archive, unarchive and delete any file or folder you select using a mouse–click. When you click on a folder, additionally you can establish a brand new folder or file in it.
The right–click choices are conveniently obtainable any time you select multiple files or folders at once.
Archive/Unarchive files
Control archives with only a click of the mouse
The File Manager provides an internal archive/unarchive option that can help you submit massive archives and then extract them in your website hosting account in the blink of an eye. Any time compressing a file or folder, you will be able to decide on the title of the archive that will be created and its particular extension – .ZIP, .RAR or .TAR.GZ. Also, you’ll be able to compress existing files or folders with just a mouse–click.
The archive/unarchive solution you can find at the File Manager means that you can make use of big files right from your Control Panel. No reason to apply any third party software for instance an FTP client as a way to upload a large file to your cloud hosting account or download any archive in your desktop.
Online file editors
Revise files straight from your Control Panel
Through the File Manager it is easy to revise your files instantly on the Internet when using any of the internal software instruments. The text editor displays the files with a plain text format, the code editor features syntax accentuating for one’s .PHP or .JS files, and then the WYSIWYG editor allows you to view your changes while they show up live. Furthermore, all changes which you make and keep can be displayed instantly online, in order for you to preview them in your browser and return to generate extra modifications, if not satisfied.
It is not necessary to download your files, to modify them through your desktop computer and to re–upload them back in your cloud hosting account. All of the editors are found using the buttons at the top of the file table or at the right–click context menus.
A logical folder structure
Your files sorted out in an intuitive approach
When you are working with a variety of web sites concurrently, it is important to have everything organized. With many other File Managers, editing a variety of websites in the exact same account is quite challenging. With the File Manager, you will find that it’s in fact quite easy. Every website has its own directory, which you can immediately acknowledge, and all of the files related to the specified web site are placed there.
And then to make everything so much easier, you will find a drop–down menu from where it’s easy to select on which host you want to work inside the File Manager. Our intelligent system will lead you there within seconds.
A user–friendly interface
Command your data with merely a click of the mouse
The NameDo NameDomains File Manager has been made in such a manner to help you feel like using the services of the file explorer on your PC. It boasts an option to drag your files and to drop them with a desired location and indicates all the obtainable edit opportunities upon clicking the right mouse button. Furthermore, the tool provides an internal file preview option as well as other file editors making it possible for you to change your files instantly from your Control Panel.
Also, we’ve provided a number of file management posts and how–to video clips to help you quickly learn how to make use of the tool.
Work with multiple files
Modify numerous files simultaneously
When using the NameDo NameDomains File Manager, it is possible to choose many files or folders just like you do notebook or desktop computer. Just hold down the Control (Command for Mac) key and click on the required files/folders. If you would like, to pick a considerable amount of files/folders simultaneously, simply click one file/folder, press the Shift key and click on any file or folder.
Once you have selected the whole set of files that you want to, it’s possible to drag them into a specified location, or use the right–click contextual menu to see an index of the accessible activities.
Quick & simple password protection options
The easiest method to take care of your data
If you need to password–secure a folder in your website, you need to set up an .htaccess file by hand. Expectedly, this can be time–absorbing and complicated if you are not an expert in web hosting. Using the File Manager, you can create a password–protected directory and conceal all of its contents from the public eye with merely a couple of mouse–clicks.
All you have to execute is right–click a folder, pick out Password Protection and after that click the Add selection. After that simply select a login name along with a password. No further configuration is required and there’s no reason to address an .htaccess file. Our platform will manage every thing on your behalf.
